X-ray imaging allows for non-destructive and longitudinal assessment of samples. X-ray imaging with high-resolution capability can increase the value of the data obtained for a more complete assessment. It’s important to understand what determines the resolution capability of a system, how resolution interacts with magnification, and when resolution matters. This will allow you not only to obtain the image quality you need for the goals of your study, but also to understand why, depending on the resolution of your system, changing magnification can affect your image in ways you may not have expected.
Before we jump into physics, let’s do a quick recap of the components of an X-ray imaging system that control resolution and geometric magnification.
The Physics of Divergent Light and X-ray Beams
Divergent light can be easily understood by visualizing how light interacts with common objects. If you were to take a flashlight and point it at a wall, you would see a circular beam of light. If you stepped closer to the wall, the circle of light would shrink and become more intense. Likewise, if you took a step back, you would see a larger circle of projected light, but with reduced intensity.
This happens because light travels and spreads in all directions away from its source, which in this case is the flashlight. When the flashlight is moved closer to the wall, the light has less time and space to spread, resulting in a smaller, more concentrated beam. When it is moved farther away, the light can spread and the beam can expand, resulting in a larger but less concentrated beam. This phenomenon of light spreading in all directions is known as divergent light.
If you were to place an object, like your hand, in front of the flashlight, you would see a shadow of your hand projected on the wall. Encountering your hand would cause the light to scatter in all directions, distorting the edges of the projected shadow. Depending on how far you are from the wall, the shadow would be larger than your actual hand due to the divergent path of the light particles and would have greater edge distortion. The farther the flashlight is from the wall, the larger your hand shadow will appear. This is a simple experience we are all familiar with, but it is a good analogy for how X-ray images are generated; how photons diverge and move away from an X-ray source towards a detector where an image is captured, and how objects in the photon path are magnified.
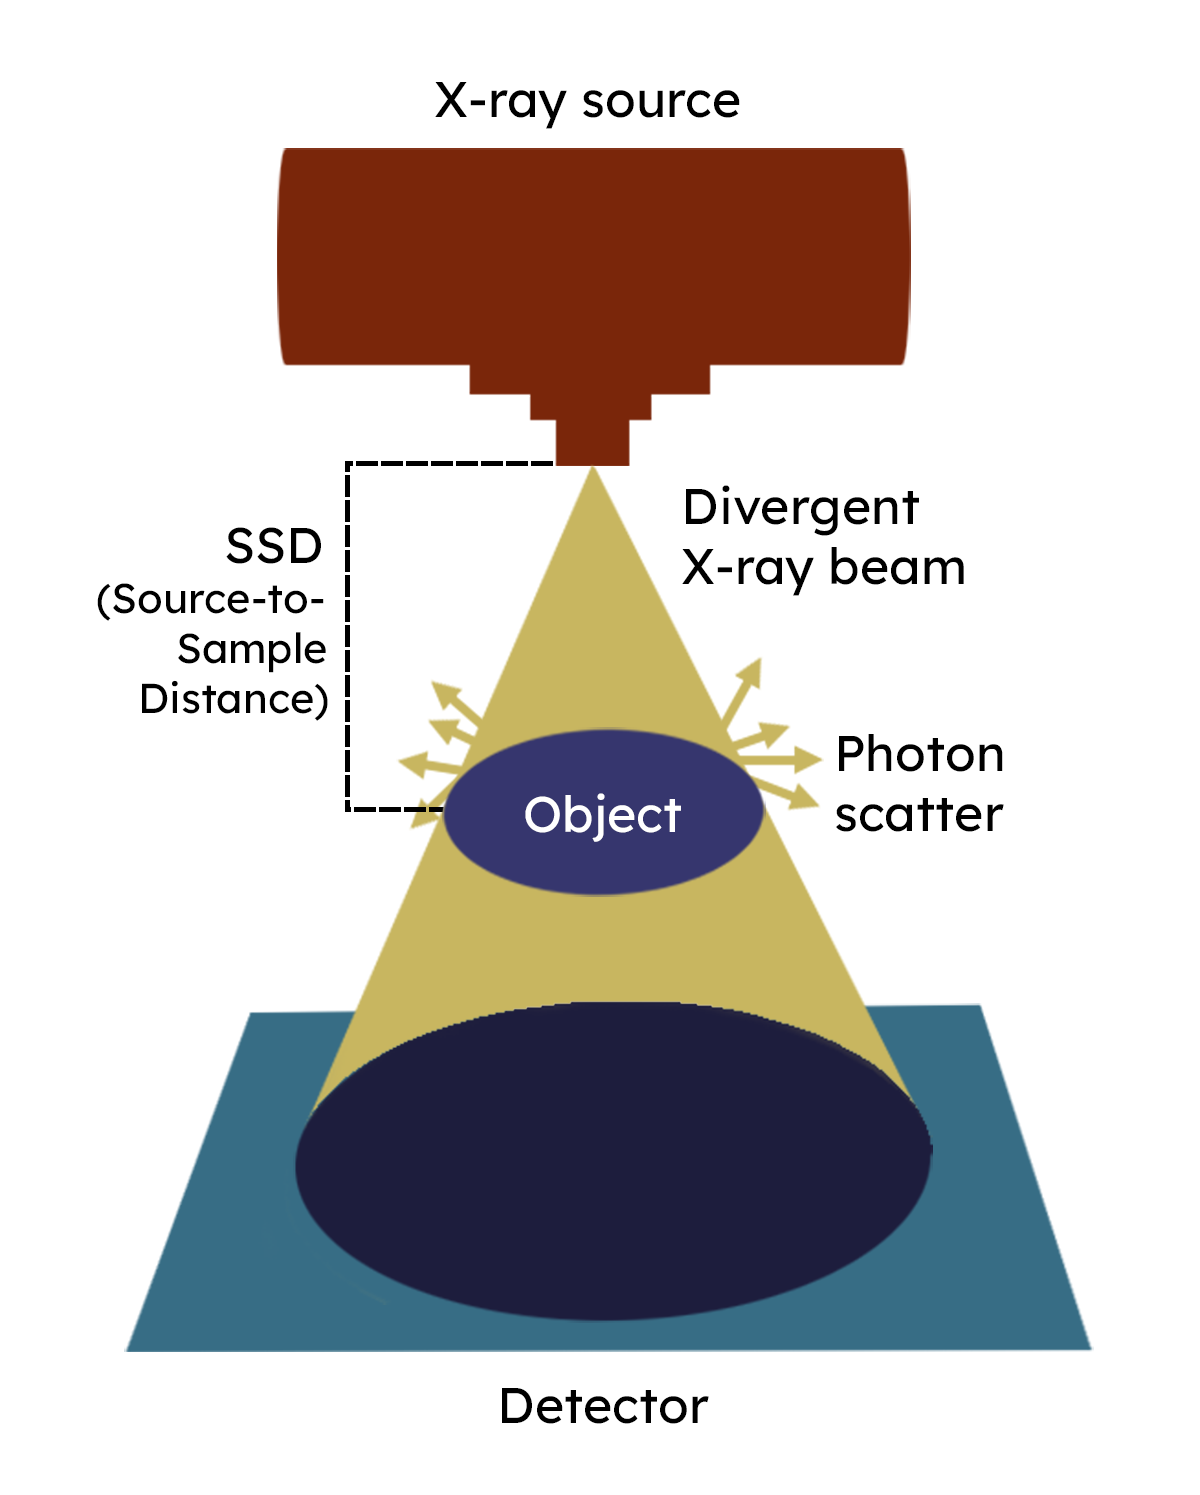
As with light, photons in an X-ray beam are also divergent. Changing the distance between the source and the object (also known as the source-to-sample distance [SSD]), or changing the distance between the object and the detector, will affect the image by increasing or decreasing image magnification. When the object is moved closer to the X-ray source and the area of the object being imaged is subsequently reduced, the image details will occupy more of the detector surface. This will allow more pixels per unit area of the detector to provide imaging information about the smaller imaged area. To put this more simply, you can also think of how higher-resolution monitor screens have more pixels per screen area, creating a better image on the screen. Decreasing the SSD will result in more pixels per imaged area, providing a better image.
- Increased Magnification: Move the object closer to the source; a larger image with relatively more pixels per surface area is produced. More pixels translate to more data and better resolution but will also result in distortion.
- Decreased Magnification: Move the object further from the source; the image approaches the object's actual size with relatively fewer pixels per surface area. Fewer pixels translate to reduced image quality but will have less distortion than images captured at higher magnification.
Geometric Blur and Image Clarity
As we’ve described, magnification relies on geometric projection. Decreasing the distance between the object and the source will increase magnification. As photons move away from the X-ray source and encounter the object, their path would bend around in all directions, distorting the shape and inevitably reducing image clarity to some degree. This increased distortion is sometimes called geometric blur (you may also see it referred to as penumbra).
The extent to which the geometric blur can be seen is impacted by two factors: the geometry of the projection (i.e. SSD, the distance between the source and sample), and the resolution of the X-ray system. Increased magnification will actually increase the penumbra. However, the higher the resolution, the less noticeable the penumbra is.
Image Clarity and Image Resolution
To be clear, changing the magnification affects image clarity while resolution cannot be changed and is a fixed characteristic of the system. This is because resolution is limited by the system’s hardware, while clarity is dependent upon resolution as well as other variables which can be optimized by the user to differing degrees
- Image Clarity: Refers to the overall sharpness and contrast vs. level of blurriness.
- Image Resolution: A measurement of an X-ray system's capability to distinguish between two small, closely spaced points in an image (i.e., line pairs per millimeter; lp/mm).
By adjusting the magnification level, energy (kV), and current (μA), the user can optimize the sharpness and contrast of an image for a given sample, but image quality is ultimately limited by the resolution. Resolution is not a setting; it defines the absolute limit of detail the system is capable of capturing.
What Determines Image Resolution?
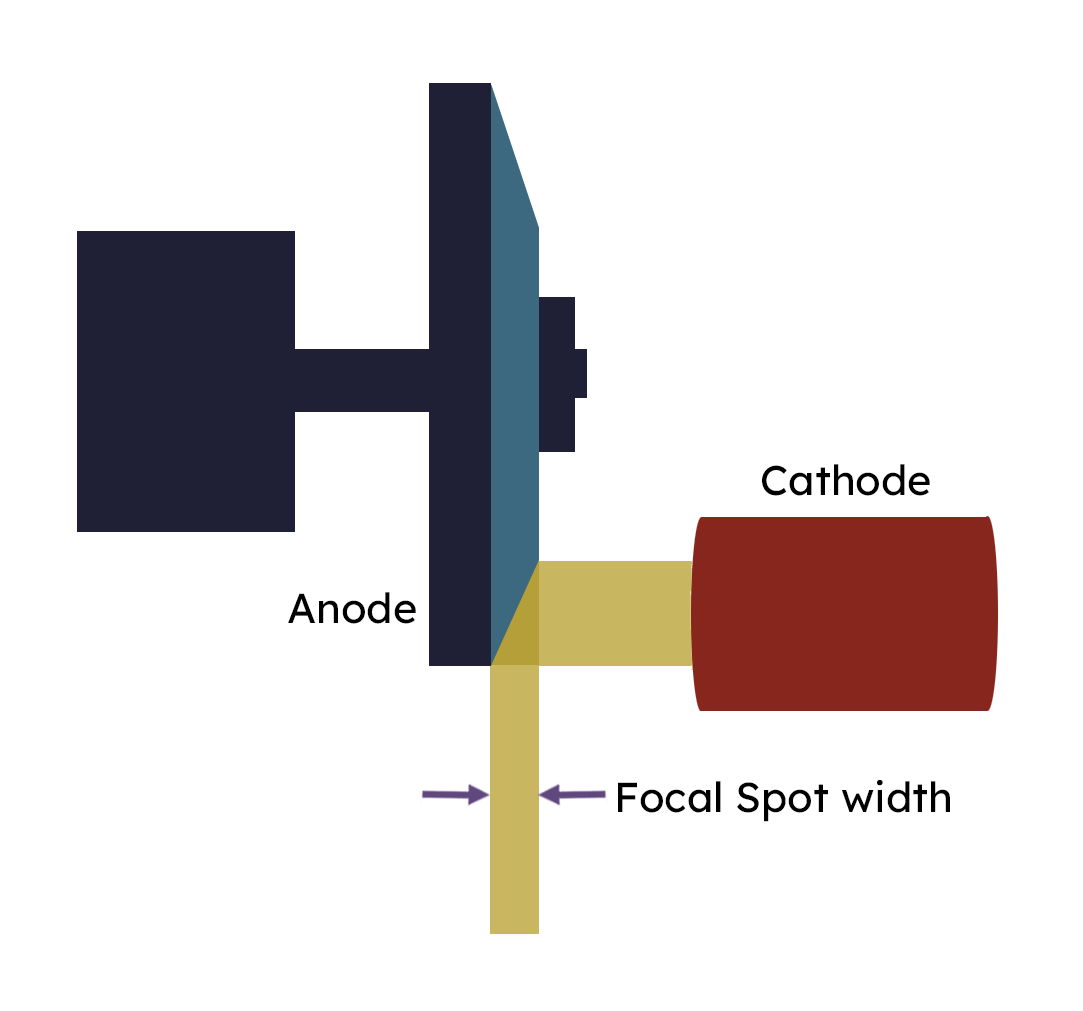
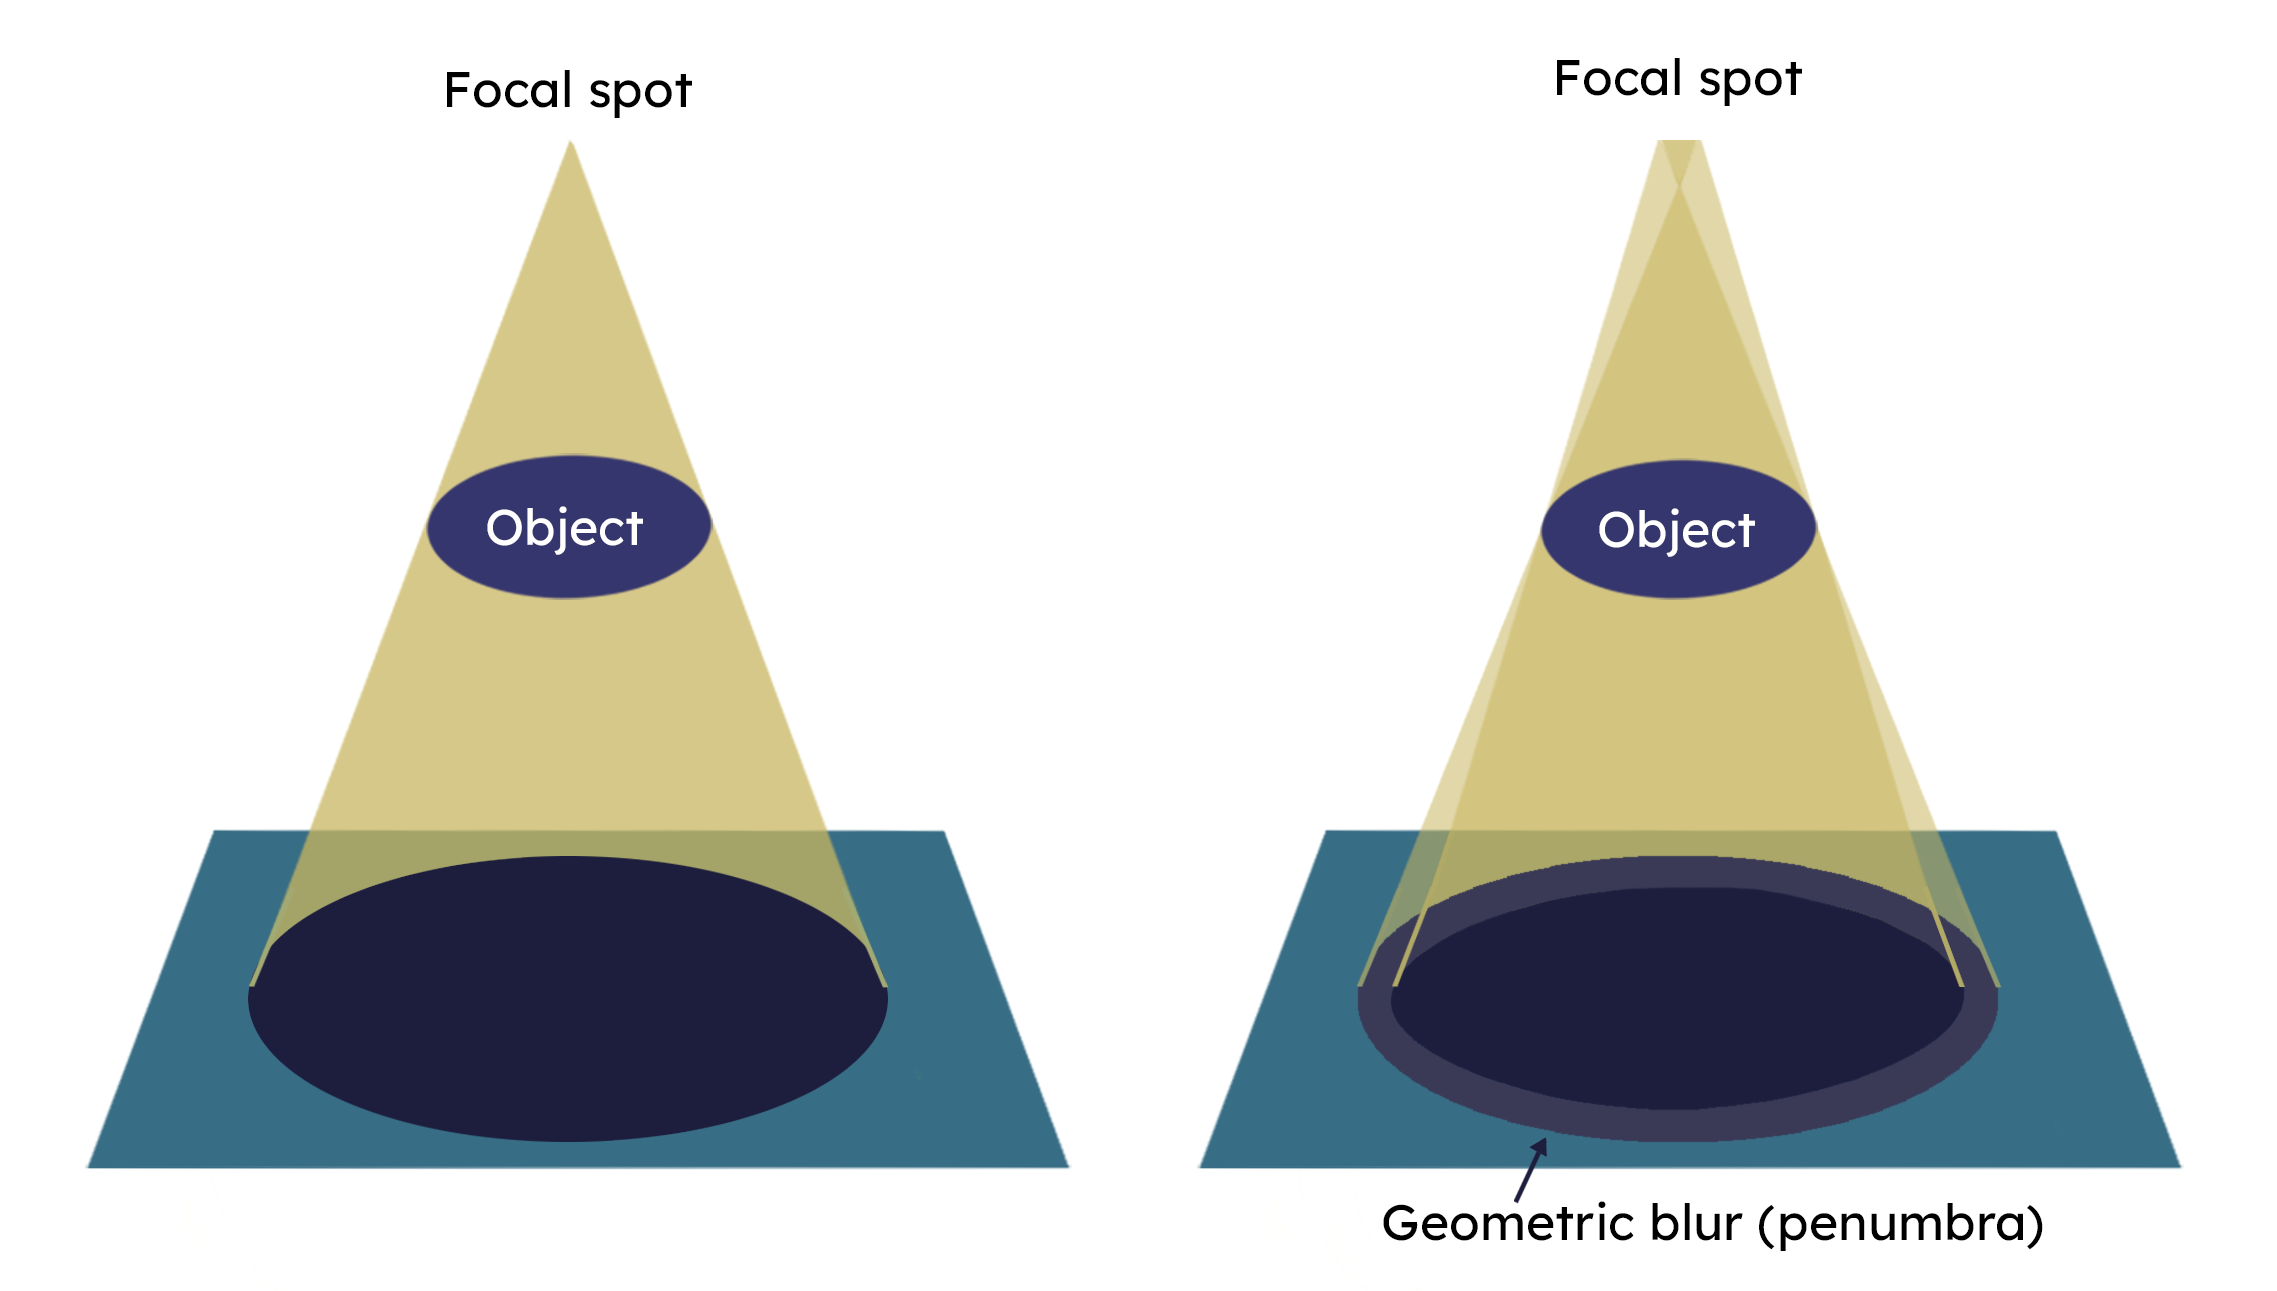
The focal spot is the point on the X-ray tube's anode where electrons strike and X-rays are generated. It is the spot from which the X-ray beams radiate to the imaging area. The size of the focal spot is the greatest contributor to the resolution of a system. In an ideal system, the focal spot would be an infinitely small point, producing a perfectly sharp beam. In reality, the spot has a finite size.
To understand how the size of the focal spot determines the resolution, remember our divergent light rays and consider what happens when they originate from multiple points within an area and spread in all directions rather than originating from one single point. The edge of any object the rays encounter would not render as a distinct line but instead would cast a hazy, partial shadow at the edge. The effect would be blurring that would be most noticeable at the edges of dense structures, such as bone. This is the geometric blur or penumbra we referred to earlier, which would increase as the size of the focal spot increased. The larger the area from which the rays emanate, the greater the blur effect, or the wider the distance between two small points that can be resolved (i.e. the lower the resolution of the system).
When Does Resolution Matter?
Resolution always matters; but it may be more critical for some experiments depending on the goals of the study.
Your need may be to resolve very small features that would require a high-resolution system, or it may be that the physiology you are imaging is large enough that it does not demand the highest resolution capabilities. It’s almost always better to have higher quality image data, which a high-resolution system can provide. But of course, there may be competing needs that have to be considered.
The Puzzle Pieces of Imaging
Like a puzzle, spatial resolution is made up of all the puzzle pieces we’ve discussed so far. It is the true resolution of the system and is determined by the focal spot of the source, the pixel size of the detector, and the SSD. These three components together comprise the resolution capability of an X-ray system. Most of the time, higher resolution is better, but the spatial resolution that will work best for you will be determined by your specific needs, which may include financial considerations, intended use, departmental or organizational needs, and personal preferences.
Focal Spot Size in Practice
Focal spot size is measured in micrometers (μm). Let’s consider a 5-micron and a 50-micron focal spot in an X-ray source, where a 50-micron focal spot may be sufficient for some imaging applications, and a 5-micron focal spot will achieve higher-resolution and is preferrable for many biological applications.
At the 50-micron focal spot size, geometric blur is manageable for imaging relatively large structures, but structures smaller than a certain threshold will not be spatially resolved.
At one-tenth the size of a 50-micron focal spot, the geometric blur of a 5-micron focal spot is dramatically reduced. The resulting images will show structural features that would be difficult to resolve on a 50-micron focal spot system.
To put this in more practical, biological terms:
- A 50-micron focal spot system may be adequate for assessing gross bone morphology or large fracture gaps for in vivo researchers, or large cracks or voids in seeds for seed researchers.
- A 5-micron focal spot system is capable of resolving trabecular architecture, fine fracture lines, and early callus formation for in vivo researchers, while seed researchers would be able to resolve the internal morphology of very small seeds.
Note that these are only guidelines. It is important to determine the needs of your research and work with a knowledgeable X-ray system representative who can determine which system can provide the best images within your budget.
Resolution and Magnification
As previously noted, positioning a sample closer to the X-ray source increases geometric magnification, making the image appear larger. However, increasing magnification will also amplify the penumbra, or the inherent blur introduced by the non-zero area of the focal spot. On a system with a large focal spot (lower resolution), increasing magnification can actually have the opposite effect of what might be expected, and make fine features harder to resolve, not easier, because the blur scales with the magnification.
On a system with a smaller focal spot (higher resolution), this tradeoff between magnification and resolution is far less noticeable. Because geometric blur is minimal to begin with on such a system, magnification can be used effectively to bring fine features into clearer view without the blur overwhelming the detail.
The take-away is that magnification cannot be used to overcome low resolution. In fact, it will only exacerbate it. Likewise, if you intend to use geometric magnification to resolve fine structural details in your samples, a high-resolution system will be required.
Choosing the Right X-ray System
Thus, power (i.e. kV and μA) and sensitivity (i.e. focal spot size) are key considerations when choosing an X-ray system. If your need is for high-resolution images, then the X-ray system you choose must have the ability to resolve features at the magnification level you need; otherwise, no amount of image optimization can compensate when the system is not capable of capturing images at a high resolution.
And as always, when optimizing images, only one variable at a time should be changed. This is the best way to determine the optimal imaging parameters for a specific sample.
